Sunday, 22 November 2009

Batch Edit Itunes Metadata using setvideokindofselected

If you have say an Elgato box, and want to watch your recording on your iPod, you might want to use the Season feature of iTunes to collate all the episodes together.You can do apple-I which shows the metadata, but this only allows you to change a recording at a time.

Much much better would be a way to batch / bulk edit the metadata.

The very excellent Doug Adams has created an Apple script that does exactly that. Download
from dougscripts.com/itunes/scripts/ss.php?sp=setvideokindofselected , and place in your library, usually ~/library/itunes/scripts.

If this is your first script, you'll get an extra menu option in iTunes


First select the shows you want to batch edit, and then start the script


You get a dialog which you work through. The episode numbering sequential, Brilliant!


click done, and the script goes to work.

One thing to note is that iTunes re-writes the files back to source, which means it can take a very long time if you do a lot at once, and iTunes will appear to have crashed. Have faith, and if you can monitor the folder where the originals are: you'll see each file in turn change its modified time. Eventually the operation will complete.


To do Reaper Season 2 took 1.5 hours!

Sunday, 15 November 2009

Howto Manage default printer settings in OSX

Managing default printer settings in OSX.

In Mac OS9 you could call up the printer and press a modifier key to save the new settings as the default. Not in OSX. YOu have to use the CUPS wed interface.

In a browser go to

http://127.0.0.1:631/


and the CUPS interface loads:

These web pages allow you to monitor your printers and jobs as well as perform system administration tasks. Click on any of the tabs above or on the buttons below to perform a task.

If you are asked for a username and password, enter your login username and password or the "root" username and password.

Click "Manage Printers" and you get


Click "Set Printer Options" and change whatever you want. You might need to logout and back in, or restart to have these take effect.


Friday, 13 November 2009

Howto take Photographs of Fireworks


I can't claim to have a magic formula, all I know is what I like.

First, you need a tripod, since I find an exposure time of 3s to 5s is about right. The ones in the slide show above are 3s, in the one below they are 5s


You need to consider that you are painting the sensor with light, so after some trial and error, here's my suggested settings:

Image quality / type: raw if you can, then you can try to recover some blown highlights
ISO: 200
Shutter: 3 seconds to 5 seconds depending on choice
aperture: f/5.6
lens: for these I used a 12-24 on my D300
keep taking photos!

Tuesday, 10 November 2009

Apple Mac OSX and wget

A kind sole has compiled wget and made it available as a package for OSX.

I needed it to get some Quicktime movies, which you can read about here.

You can get it from here.

Thank you!

UPDATE: The link above is dead, someone else has compiled and made a package and installer.

Saturday, 7 November 2009

Howto get Android Screen Shots

Howto get Android Screen Shots. If you don't want to root your phone, or don't know how, there is still a way to get screenshots of your Android device.

Basically you need to do two things: put your phone into USB Debug mode, and get the SDK from Google.

1 - Putting your phone into USB Debug mode:

Got to settings, or from the Home page press 'menu' and the 'settings' shortcut appears.


Then scroll down to Applications


Press 'Development'


And finally 'USB debugging'


And then connect your phone to the USB.

2 - Next get the SDK from Google developer.android.com/sdk/index.html. The current release, as of November 2009 is r3. Download and install in usual manner. I use OSX so I got the OSX one.

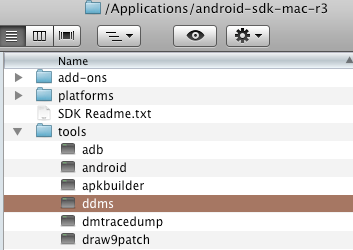
Then when your phone is in USB debig mode, navigate to where you installed the SDK, and find the tool 'ddms'.

For me the path is /applications/android-sdk-mac-r3/tools/ddms.


Double click 'ddms' and the next thing is a terminal window opens, and a few seconds later the ddms application. It should launch and find the attached phone.


Select the device, and from Device menu select 'screenshot'.


A window opens that is a faithful replica of what the Android currently shows


Click 'copy' and then you can paste this into another application.

On OSX Preview does the job. Simply go to file>new from clipboard, or press Apple-N


and you're done. When you want to capture a new screenshot, click 'refresh' and the capture will update.

Wednesday, 4 November 2009

Howto enable disk mode on iPod Touch 2G and iPhone


Howto enable disk mode on iPod Touch 2G.

Short answer: as of iPod Touch software 2.2.1 there is no built in way to do it. I guess this is because the OS on the Touch is a cut down version of OSX, while on regular iPods its not.

I've found two third party methods of having disk mode on your Touch (and iPhone as well): Phoneview $19.95

screenshot from www.ecamm.com

and Touchcopy at $24.99


screenshot from www.wideanglesoftware.com

Update: There's another application that make you iTouch / iPhone show as a disk: iphone explorer from www.iphone-explorer.com. Seems to work OK, and its free!


You can get even better value by installing Good Reader from www.goodiware.com/goodreader.html, currently $.99.

Sunday, 1 November 2009

Maximum Size Apple Partition Map

Got a super Seagent FreeAgent Pro eSata / Firewire / USB hard drive. Comes a funky module to switch from eSata / USB to dual Firewire 400.

Anyway, it also comes formatted NTFS, which is no good, so I reformatted as HFS+ Extended / Journalled.

So I fired up Disk Utility, and reformatted the drive. Well it failed. Weird. Here's the log:

2009-10-27 19:39:47 +0000: Preparing to erase : “Untitled”
2009-10-27 19:39:47 +0000: Partition Scheme: Master Boot Record
2009-10-27 19:39:47 +0000: 1 volume will be created
2009-10-27 19:39:47 +0000: Name : “Untitled”
2009-10-27 19:39:47 +0000: Size : 698.6 GB
2009-10-27 19:39:47 +0000: Filesystem : Mac OS Extended (Journaled)

2009-10-27 19:39:47 +0000: Creating partition map.
2009-10-27 19:39:49 +0000: Formatting disk3s1 as Mac OS Extended (Journaled) with name Untitled.
2009-10-27 19:39:50 +0000: Disk Erase failed with the error:

File system formatter failed.
2009-10-27 19:39:51 +0000: Erase complete.
2009-10-27 19:39:51 +0000:
2009-10-27 19:39:51 +0000: Disk Utility failed during an unspecified action with the error:

File system formatter failed.
2009-10-27 19:39:51 +0000: Erase complete.
2009-10-27 19:39:51 +0000:
2009-10-27 19:39:52 +0000: Erase complete.
2009-10-27 19:39:52 +0000:

After a bit of Googling, seems that the new 750Gb drive is too big to be formatted as Apple Partition Map. My slightly older 640Gb is OK with Apple Partition Map:


The answer is to format as GUID. In Disk Utility, click on Partition and then select one partition:


Click Options, and select GUID:


after the format, you can see the difference:


The curious thing is that Apple Partition Map supports bigger partition sizes, I think.

PS The drive is GREAT!