From previous blogs, I'd been having problems with the wireless not connecting to a WPA network. Unencrypted worked fine. Don't know about WEP since I don't run it.
It seemed to me it was possibly a wireless card problem, since running WPA involves the OS pushing code to the card, and I'd noticed that the card was 'unknown'. So after trying a few things, one day while browsing ebay I saw a genuine Apple Airport card, for the grand sum of £10. Bought it, fitted, and now I'm on WPA.
So my previous suggestion to get the Broadcom 1490 based card I would now revise to get a genuine Apple Airport, if you can. I'm sure that there are 3rd party ie non Apple branded cards that work OK with WPA.
Update: Found this link to some possible options on ebay
Sunday, 31 August 2008

Friday, 29 August 2008
Slowing down mp3s and other sound tracks
In a previous tip I showed how to slow down a movie.
This technique does not seem to work for mp3s.
For one purpose I needed to slow down a sound track about 10%. For this I used Audacity which works really nicely.
Open the file, and then from the Analyze menu select 'Change Tempo'. Put in a percentage. As a guide if you don't want the ear to 'hear' that things are slowed down / speeded up you cannot change more than about 10% or 12%, your mileage will vary.
Since Audacity can open various file types eg .wav .aif and even .mov, and then export to mp3 if you get the free LAME plugin, this technique works well for most sound sources.
This technique does not seem to work for mp3s.
For one purpose I needed to slow down a sound track about 10%. For this I used Audacity which works really nicely.
Open the file, and then from the Analyze menu select 'Change Tempo'. Put in a percentage. As a guide if you don't want the ear to 'hear' that things are slowed down / speeded up you cannot change more than about 10% or 12%, your mileage will vary.
Since Audacity can open various file types eg .wav .aif and even .mov, and then export to mp3 if you get the free LAME plugin, this technique works well for most sound sources.
Wednesday, 27 August 2008
OSX Leopard - changing the Startup Image
There are 3 ways to change the image OSX starts up with.
1. Save your new image in the path /system/library, and then change the loginwindow prefs: (command may wrap)
sudo cp /path/to/picture/picture.jpg "/library/desktop pictures/picture.jpg"
sudo defaults write /Library/Preferences/com.apple.loginwindow \ DesktopPicture "/Library/Desktop Pictures/Aqua Blue.jpg"
2. Replace the startup screen image
cd /System/Library/CoreServices
sudo mv DefaultDesktop.jpg DefaultDesktop.jpg.old
sudo cp /Path/to/picture/you/want/to/use/image.jpg DefaultDesktop.jpg
3.There's a shareware application to do it for you - it also does the login window as well.
Download Visage from http://keakaj.com/visagelogin.html and register for $4.95.
1. Save your new image in the path /system/library, and then change the loginwindow prefs: (command may wrap)
sudo cp /path/to/picture/picture.jpg "/library/desktop pictures/picture.jpg"
sudo defaults write /Library/Preferences/com.apple.loginwindow \ DesktopPicture "/Library/Desktop Pictures/Aqua Blue.jpg"
2. Replace the startup screen image
cd /System/Library/CoreServices
sudo mv DefaultDesktop.jpg DefaultDesktop.jpg.old
sudo cp /Path/to/picture/you/want/to/use/image.jpg DefaultDesktop.jpg
3.There's a shareware application to do it for you - it also does the login window as well.
Download Visage from http://keakaj.com/visagelogin.html and register for $4.95.
Monday, 25 August 2008
OSX - Changing about this Mac picture
The MacVent (OSX on Advent 4211) still has small issues, but one thing that is easy to fix is the 'About this Mac' picture.
First I got a nice picture of the machine off the internet. Then I photoshop'ed in my actual screen. After that we have to make it into the correct format.
1. Make it the correct size which is 214 x 124. First I used 'Image size' and made the smaller dimenion so it would fit which turned out to be the height. So I made that 124, and then used 'Canvas Size' to expand the canvas to 214. In fact you may want to ensure a little transparency at the bottom else it'll overlap with the OS version information, so if I did this again I would use 214 x 120.

2. Make the image so it floats on a transparent layer

3. Then save as 'tiff' - don't worry about the color profile

4. The key bit is the Tiff options. Make sure you have 'save transparency' selected

6. Now save as 'MacOSX.tif' somewhere convenient, say your desktop.
7. We need to copy it to the correct place. Here the commands - may wrap
cd /system/library/coreservices/loginwindow.app/contents/resources
sudo mv MacOSX.tif MacOSX.tif.old
sudo cp ~/desktop/MacOSX.tif MacOSX.tif
This copies the current one so we can get it back if we want, and the copies the one we just made into the correct place.
Log out and back in, and the go to 'About this Mac'
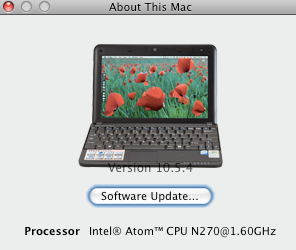
First I got a nice picture of the machine off the internet. Then I photoshop'ed in my actual screen. After that we have to make it into the correct format.
1. Make it the correct size which is 214 x 124. First I used 'Image size' and made the smaller dimenion so it would fit which turned out to be the height. So I made that 124, and then used 'Canvas Size' to expand the canvas to 214. In fact you may want to ensure a little transparency at the bottom else it'll overlap with the OS version information, so if I did this again I would use 214 x 120.

2. Make the image so it floats on a transparent layer

3. Then save as 'tiff' - don't worry about the color profile

4. The key bit is the Tiff options. Make sure you have 'save transparency' selected

6. Now save as 'MacOSX.tif' somewhere convenient, say your desktop.
7. We need to copy it to the correct place. Here the commands - may wrap
cd /system/library/coreservices/loginwindow.app/contents/resources
sudo mv MacOSX.tif MacOSX.tif.old
sudo cp ~/desktop/MacOSX.tif MacOSX.tif
This copies the current one so we can get it back if we want, and the copies the one we just made into the correct place.
Log out and back in, and the go to 'About this Mac'

Friday, 22 August 2008
Summary of OSX on MSI Wind / Advent 4211 after a few days
Well so far so good. The ethernet is fixed, it runs my Dell 24" monitor at 1920x1200, the workaround for the graphics problem is found.
Only 2 issues remain: audio from the headphone socket, and it will not run WPA.
I have a few new items on the wishlist:
- to properly hibernate.
- turn off tap to click
- lid-down operation would be good. Maybe this requires wake on USB?
Only 2 issues remain: audio from the headphone socket, and it will not run WPA.
I have a few new items on the wishlist:
- to properly hibernate.
- turn off tap to click
- lid-down operation would be good. Maybe this requires wake on USB?
OSX ethernet problems on MSI Wind / Advent 4211
One of the final problems to be resolved in my mac-inating my MSI Wind / Advent 4211 was that although the Realtek ethernet adapter showed up in the Network control panel. its status was always 'Not Connected', even though the cable is known to be good.
After investigation it turns out that the issue is an auto-negotiation error. To fix I clicked on the ethernet adapter, selected 'advanced' and then the 'ethernet' tab. I changed 'automatically' to 'manual', and then went to the lowest common denominator which is 10baseT and half-duplex.
Click OK and the apply, and it connected and got an IP. From there I worked through the various ethernet combinations.
After investigation it turns out that the issue is an auto-negotiation error. To fix I clicked on the ethernet adapter, selected 'advanced' and then the 'ethernet' tab. I changed 'automatically' to 'manual', and then went to the lowest common denominator which is 10baseT and half-duplex.
Click OK and the apply, and it connected and got an IP. From there I worked through the various ethernet combinations.
Thursday, 21 August 2008
OSX screen resolution issue on MSI Wind / Advent 4211
My hackintosh conversion of the Advent 4211 is going nicely.
However, the graphics card does not always get picked up correctly and I get an incorrect resolution 800x600. The workaround is to delete the kext cache which you can do by using kexthelper to install any old kext and reboot(the system rebuilds the cache), or use scripts to do it on shutdown / startup.
Look for the files /etc/rc.shutdown.local and /etc/rc.reboot.local. If they exist then add the lines below. If not create them, and then make them executable:
sudo touch /etc/rc.shutdown.local
sudo touch /etc/rc.reboot.local
sudo chmod +x /etc/rc.shutdown.local
sudo chmod +x /etc/rc.reboot.local
the lines you need to add. If the files already existed then add at the top of the file.
#!/bin/bash <----- if the files already exist then not required
rm -rf /System/Library/Extensions.mkext
rm -rf /System/Library/Extensions/Caches/
rm -rf /System/Library/Caches/
After this you should get 1024x600 all the time
However, the graphics card does not always get picked up correctly and I get an incorrect resolution 800x600. The workaround is to delete the kext cache which you can do by using kexthelper to install any old kext and reboot(the system rebuilds the cache), or use scripts to do it on shutdown / startup.
Look for the files /etc/rc.shutdown.local and /etc/rc.reboot.local. If they exist then add the lines below. If not create them, and then make them executable:
sudo touch /etc/rc.shutdown.local
sudo touch /etc/rc.reboot.local
sudo chmod +x /etc/rc.shutdown.local
sudo chmod +x /etc/rc.reboot.local
the lines you need to add. If the files already existed then add at the top of the file.
#!/bin/bash <----- if the files already exist then not required
rm -rf /System/Library/Extensions.mkext
rm -rf /System/Library/Extensions/Caches/
rm -rf /System/Library/Caches/
After this you should get 1024x600 all the time
Subscribe to:
Posts (Atom)